Add a Recording to My Media — Again
If the recording was made with the Kaltura Capture app, or a copy of the recording was saved elsewhere, it can be uploaded to My Media, automatically closed captioned, and embedded in a D2L course file.
Deleting a recording from the My Media repository in eLearning@UNG (D2L) does not delete the file from the Kaltura Capture app.
Re-Upload with Kaltura Capture App
Recordings made with the Kaltura Capture app are stored on the computer used to make the recording. If the file wasn’t deleted from the app, Kaltura has a Re-Upload button that can send a copy of the recording to the user’s My Media repository.
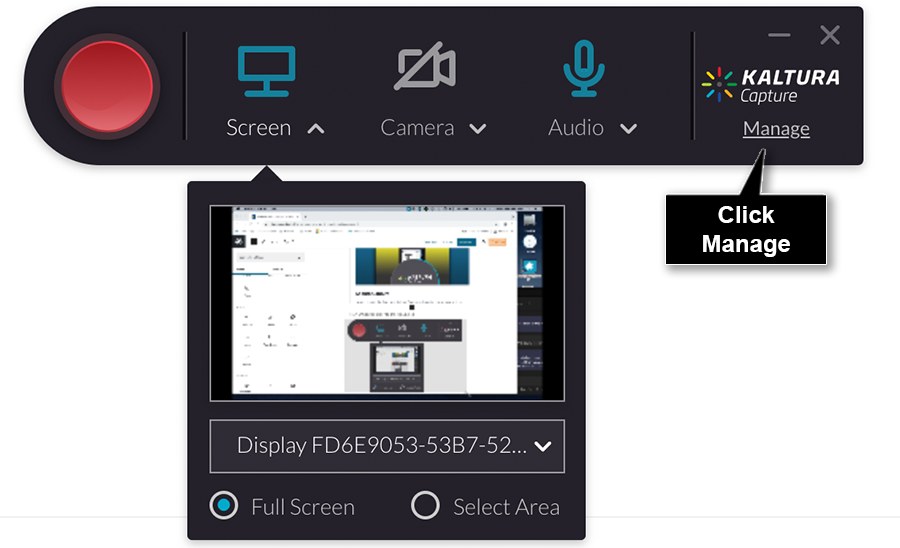
Step 1 Launch the Kaltura Capture app.
Step 2 Click the Manage link on the recorder.
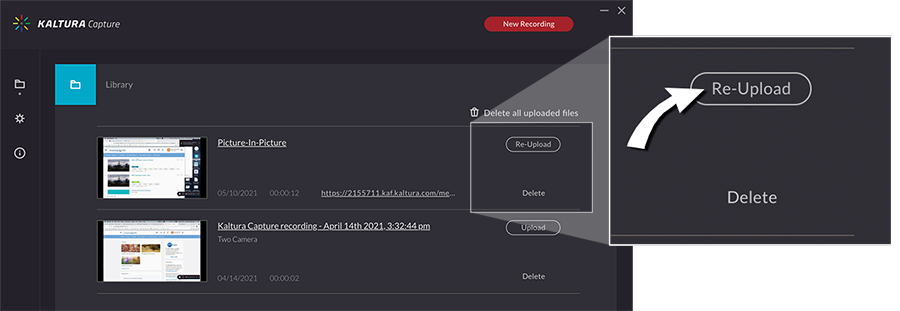
Scroll through the Kaltura Capture Library to locate the recording.
Note: If a recording was created with the Kaltura Capture app on another computer (home, work, personal computer, etc.), the file will be on that computer.
Step 3 Click the Re-Upload button on the right side of the recording above the delete link.
The file will upload to your My Media repository in eLearning@UNG (D2L) and automatically machine caption the recording.
The automated closed captions must be edited for accuracy. It’s easy to do with the Kaltura Closed Captions Editor. (See Media Captions Must Be Edited April 2021 DETI Digest)
Upload a Recording with Media Upload
Recordings not created with Kaltura Capture can be manually uploaded using the Media Upload link in My Media.
Deleting a recording from the My Media repository in D2L Brightspace does not delete the recording from the computer where it was made, and vice versa.
Step 1 On the eLearning@UNG (D2L) homepage, click the My Media link on the blue navbar.
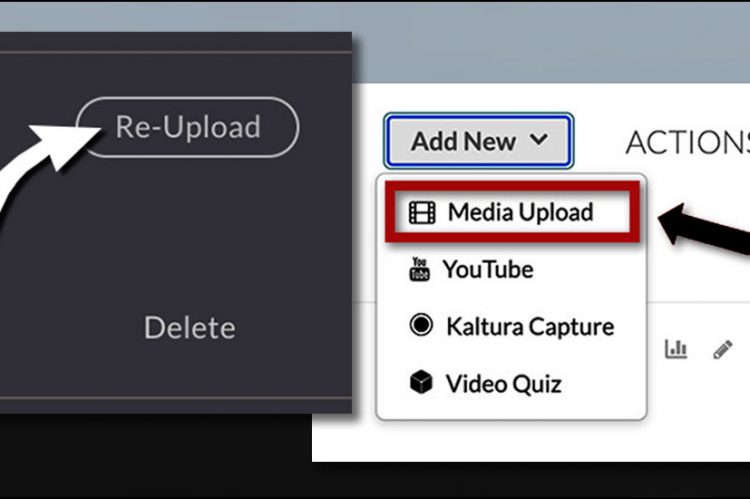
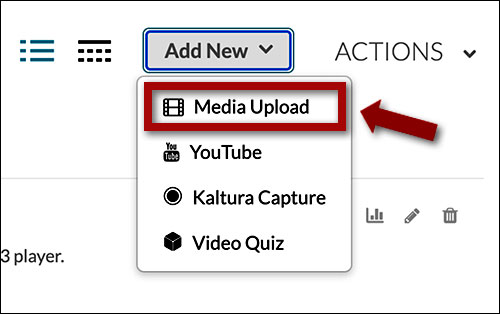
Step 2 Click the Add New button.
Step 3 Select Media Upload from the drop-down menu.
Step 4 Either drag the media file to the page or click the Choose a file to upload button and navigate to the file. Click the file name and click Open.
Kaltura will upload, process, and automatically caption the recording.
Note: Kaltura Capture picture-in-picture videos are two videos combined by Kaltura software. They must be downloaded separately. See Download Media from D2L – Picture-In-Picture Instructions PDF. (UNG login required)
At this time, downloaded picture-in-picture videos must be combined into one video with video editing software. DETI can combine these videos. Contact DETI for details.
If the video is in the Kaltura Capture app library, use the Re-Upload button. The app will upload both videos and combine them into the picture-in-picture format.
How to Upload a Closed Caption File
If a corrected closed caption was downloaded and saved to a computer, the caption can be uploaded again to a recording in My Media.
After Kaltura processes the uploaded recording and creates an automatic closed caption, delete the new caption and upload the corrected caption from your computer.
Note: If the recording’s caption was not edited, there is no need to upload the caption. Allow Kaltura to create a new automatic closed caption and correct errors using the Kaltura Captions Editor. (See DETI Basics: Closed Captions March 2022 DETI Digest)
Step 1 On the eLearning@UNG (D2L) homepage, click the My Media link on the blue navbar.
Step 2 Search or scroll through the list of media to locate the recording.
Step 3 Click the Pencil icon to the right of the recording title.
Step 4 Click the Captions link under the large video player.
Step 5 Click the Download icon. This is your backup caption file in case you need it. Be careful. It’s easy to get caption files mixed up because all captions in English are called English.srt.
Step 6 Click the X icon to delete the caption used by the recording.
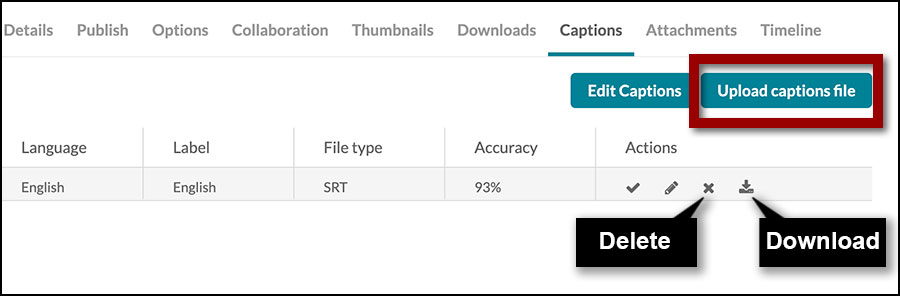
Step 6 Click the blue Upload captions file button.
Note: There should be only one caption file unless an additional language caption file has been created.
Upload Captions Pop-Up Window
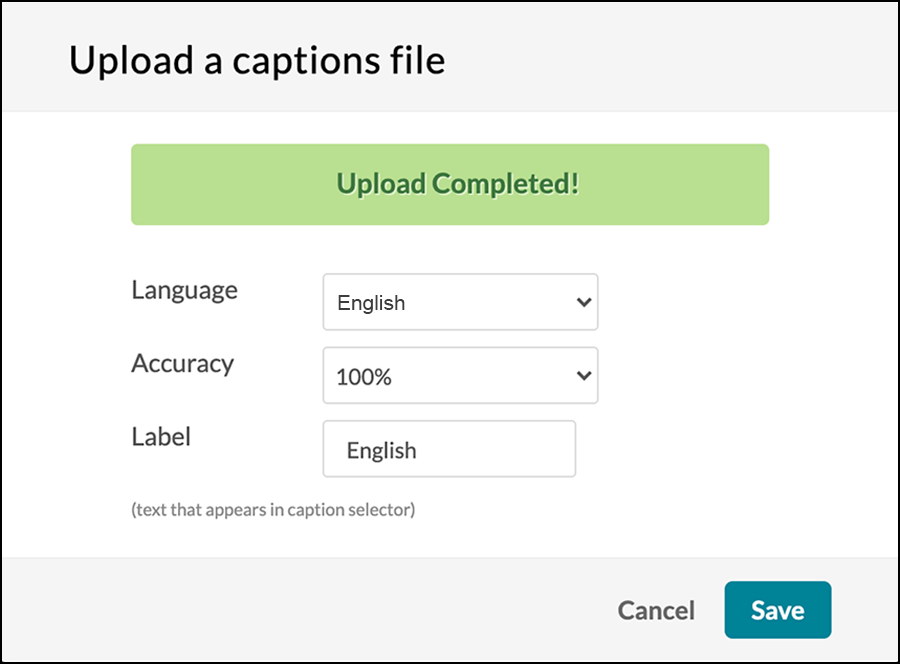
Step 7 Click the Browse button and navigate to the caption file you want to upload (captions have the file extension .srt).
Step 8 Select the caption file. Click the Open button. Wait for the Upload Completed message in the pop-up window.
Step 9 In the pop-up window, select the following options from the drop-down menus: Language English, Accuracy 100%, Label English.
At this time, Kaltura can only automatically caption recordings made in English.
Step 10 Click the Save button.
Note: After a caption is deleted, it is not possible to generate a new caption. You must either upload a caption (or the backup caption) or re-upload the media file again and have Kaltura generate a new caption.
Always correct mistakes in an automatic caption.
Resources
DETI on SharePoint
Visit DETI’s website on myUNG (UNG login required)
Kaltura Video Platform Section (UNG login required)
How to Edit Captions in My Media (PDF, UNG login required)