
It’s as Easy as H1, H2, H3
Don’t confuse using heading styles with making text larger or bolder. It’s not the same thing.
They may look the same when viewed in a web browser, but to a visually impaired person using a screen reader, heading styles make online content more accessible. Changing a font size or using bold text does not.
Proper Use of Heading Styles
Heading styles automatically create HTML headings (<H1>, <H2>, etc.). Screen readers (a machine or software used to convert written text to speech or braille) use headings to help the visually impaired understand the page content. It’s similar to using headlines and subheads to help a sighted person read the content on a page of text.
Heading tags (H tags) provide navigation links that allow the screen reader to jump to different sections of the page. WIthout H tags, the screen reader could only read the entire page from top to bottom.
Headings help organize content to make it easier for everyone to read. Headings break up the page content into smaller, organized chunks. Think of it as an outline for the content.
Heading Tag Sizes
The web browser converts headings into different sizes of text. Headings come in six levels, from H1 (largest size) to H6 (smallest size). On a properly formatted page, there will usually be one (occasionally two) H1 tags. There may be a number of H2 tags and subsection H3 tags. H4 is rarely used. And while H5 and H6 do exist, it’s not likely they will be needed. The Brightspace Editor in eLearning@UNG (D2L) does not provide H5 and H6 tags.
H Tags in Brightspace by D2L
When text is written using the D2L Brightspace Editor (formerly the HTML Editor), it is displayed using the computer’s web browser. However, a screen reader “reads” from the source code.
We don’t recommend editing the source code, but in the example below, we show how the web browser text and the source code are connected.
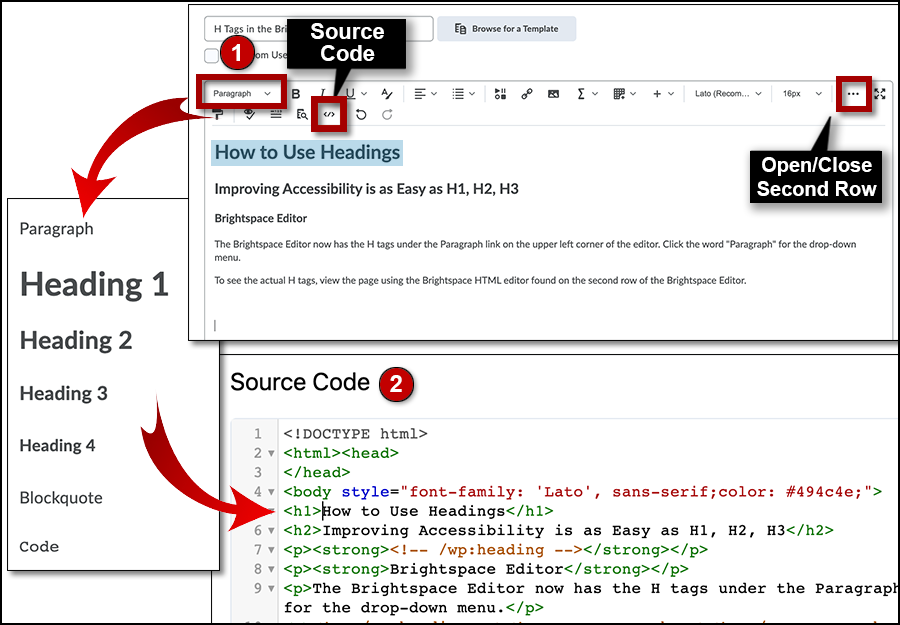
2) The heading H1 tag is visible in the HTML source code. The text is displayed in the web browser as large, bold text.
Remember: When making content for online use, never use heading styles to simply make text larger or bolder.
The Brightspace Editor also provides a styles shortcut. Highlight text in the Brightspace Editor and a small window pops up that includes H2 and H3 links. Click an H2 or H3 link to change the text heading.
Heading Tips
Here are a few things to remember when creating content for online use:
- Headings should be short.
- Don’t add heading levels to a paragraph.
- Start the document with text that is tagged H1.
- Use H2 tags to highlight important sections of the document.
- Use H3 tags to divide H2 sections into smaller sections, if necessary.
- The content will be used by sighted people and the visually impaired. Ask yourself if the layout make sense.
How Heading Styles Look in a Web Browser or Word Document
H1 – Use one H1 tag. This is the subject of the page.
H2 – Use H2 tags as needed. These are section headings.
H3 – Use H3 tags for subsections of H2 content.
H4 – The H4 tag is rarely used. It is a subsection of an H3 tag.
Normal Text – This is also referred to as Body or Paragraph text.
Watch the Video: How a Screen Reader is Used (youtube.com)
Heading Styles in Word, PDF, PowerPoint, and Anthology Ally
To preserve tab order and to make it easier for screen readers to read your documents, use a logical heading order and the built-in formatting tools in Word. For example, organize headings in the prescribed logical order. Use Heading 1, Heading 2, and then Heading 3, rather than Heading 3, Heading 1, and then Heading 2. And, organize the information in your documents into small chunks. Ideally, each heading would include only a few paragraphs.
– Microsoft
Microsoft Word: Word has customizable heading styles on the ribbon (toolbar). The Styles Pane lets the user create additional heading levels, change font family, font size, and color. The styles can be edited and saved. Read Microsoft’s instructions: Customize or create new styles.

PDF: When a Word document is saved as a PDF, the H tags are used in the PDF. This improves the accessibility of the PDF document. (Read: PDFs and Anthology Ally in the June 2021 DETI Digest)
PowerPoint: Use the appropriate built-in slide design to create a title and content. The design templates are formatted to be read in the proper order using a screen reader.
Anthology Ally: Ally checks for accessibility in content created with the Brightspace Editor and files uploaded to D2L, such as PDF and Word documents. The content will receive a higher accessibility score from Ally by starting a file with an H1 heading.
Learn More About Anthology Ally
Anthology Ally (formerly Blackboard Ally) provides D2L content in alternative formats for students and includes an automatic accessibility checker for instructors. Ally will locate accessibility issues in a course module, provide instructions to correct the issue, and rate the content for accessibility.
Related Links
Heading and Style Information from Microsoft:
- Microsoft Word: Customize or Create New Styles
- Microsoft Video: Improve Accessibility Heading Styles in Word
- Microsoft Video: How to Save Time Using Styles
- Microsoft Video: Accessibility Video Training for Office Products