
Icons of Kaltura CaptureSpace (left) and the replacement software, Kaltura Capture.
Kaltura’s desktop recording software Kaltura Personal Capture has replaced Kaltura CaptureSpace (see Introducing Kaltura Personal Capture, May 2019 DETI Digest).
Download and start using Kaltura Capture to record lectures and presentations with your desktop or laptop computer.
If you have been using Kaltura CaptureSpace to create lectures, you might accidentally record a new video using this outdated software. Or perhaps you recorded a video some time ago but haven’t yet uploaded the video to Kaltura. Clicking the video’s “Upload now” link will result in an error message. The video will not upload.
Upload Error Message
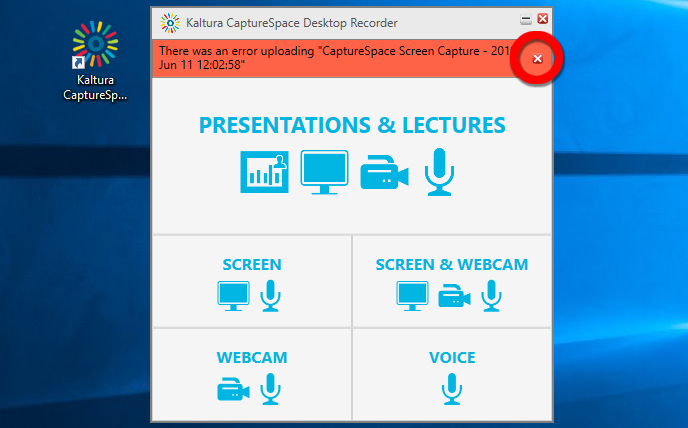
(Image 1) Uploading media (audio or video) created with CaptureSpace will result in an error message. Click the “X” to close the message.
(Image 1) Click the “X” to close the error message.
Don’t panic. You can still upload the recording. You just can’t upload with CaptureSpace.
Locate the CaptureSpace Folder
Kaltura renames your files (for security reasons). Finding a particular media file is not always easy.
(Image 2) Click the Library tab to see the CaptureSpace media stored on your computer. Now would be a good time to delete files you don’t need.
Mouse over a video title and click the recycle bin to delete the media. Click the “eye” icon to add a description, tags, or play the video. Uploading the video is not an option.
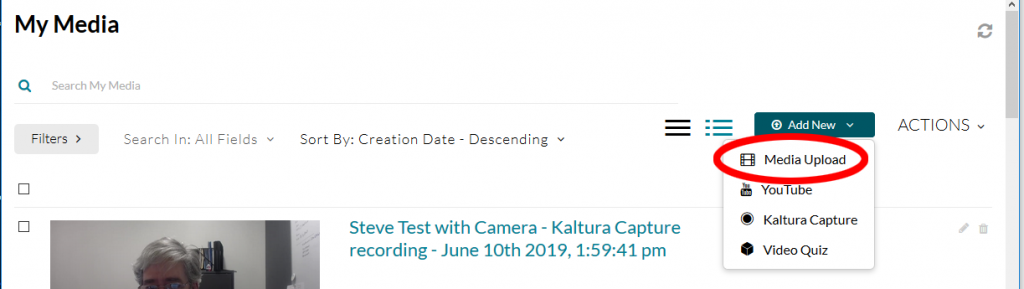
(Image 3) Click the Settings tab to reveal where CaptureSpace media is stored on your computer. Use the URL to navigate to the folder.
On Windows 10 machines, you can search for the Kaltura media folder using the Kaltura CaptureSpace Local Media Files Storage URL.
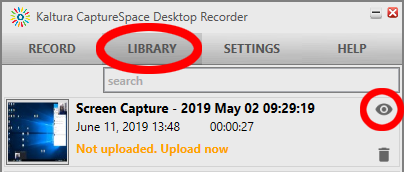
(Image 2) Click the Library tab to see your media, delete files or play them.
Copy the URL, click the “magnifying glass” icon (bottom-left of home screen) and paste the entire Local Media Files Storage URL into the Search window. Click the result (highlighted in light blue) to open the folder.
Your videos are located in folders with very long, secure (scrambled) names. You can locate and play a media file (right-click the .MP4 file and open with Windows Media Player). You can also duplicate the file, rename it, or move a copy to another location on your computer.
It is a good idea to copy the media you would like to archive and move it to different, easy to access folder. It would be also be wise to rename the copied media files so that you know what they are. You don’t need to copy the image (.jpg) files.
Use My Media to Upload CaptureSpace Files

(Image 3) Click the Settings tab to reveal where CaptureSpace has stored media on your computer. Use the URL to search for the folder.
(Image 4) In eLearning@UNG (D2L), navigate to the My Media section. Click the blue Add New button, drag down to Media Upload. Drag the .MP4 file to the eLearning page. Upload will begin.
Change the file name and description (if you wish) and click Save.
After the video has been processed, the CaptureSpace video is stored in Kaltura.
Record New Presentations with Kaltura Capture
Be sure to download and install Kaltura Capture.
In eLearning@UNG (D2L), navigate to the My Media section. Click the blue Add New button and drag down to Kaltura Capture.
Choose the link for your computer’s operating system and install. You only have to install the software once.
(Image 4) In My Media, click the Add New button and drag down to Media Upload.